How To Use A Green Screen Virtual Set in Premiere Pro

Premiere Pro is a video editing software created by Adobe. This timeline-based software is a fantastic choice for producers, video editors, and other creators to edit videos for all platforms. While Premiere is a paid software, it is considered one of the leading video editing software options.
The Movie:
If you’d prefer to watch a video tutorial, here is a tutorial on how to add a background or virtual set to your video in Premiere Pro 2022.
Step 1: Setup A Green Screen & Film Your Presenter
A green screen will work best when it comes to adding a new background to your video in Premiere Pro. Simply hang a green screen (or a green sheet if you want!) behind the main presenter or subject.
Make sure your green screen is as smooth as possible (aka no wrinkles). It’s also best to avoid any additional shadows or light casting onto the screen. This will make it much easier to replace the green screen with a background.
Also, film any b-roll you may want to include. (No green screen required!)

Step 2: Start Premiere Pro & Import Content
Open the Premiere Pro software, create a new project, and name it anything you want.
This is also where you’ll want to import the content you’ve filmed with your presenter, as well as your virtual set templates and any social media animations you want to use.
You should see everything you’ve imported in your Project Panel.
Step 3: Create A New Sequence
In Premiere Pro, a composition is known as a sequence in the size of your virtual set.
In the Project Panel. Drag your virtual set .mp4 clip down into the new sequence button. This will create your new sequence. You should see your virtual background in the Program Monitor.
Step 4: Add Green Screen Footage To Sequence
From the Project Panel, drag your green screen footage with your presenter into the Timeline. You’ll want your green screen footage to appear above your virtual set in the Program Monitor.

Step 5: Add Ultra Key Effect
In the Effects panel, add the Ultra Key effect to remove the green screen from behind the presenter. Drag this effect down onto your green screen footage in the Timeline.
Pro Tip: You can search for ‘Keying’ in the Effects Panel and the Ultra Key effect will pop up.
Step 6: Remove The Green Screen
In Effect Controls, use the Key Color eyedropper tool to select some of the green in the green screen in your scene. (The background is targeted by the color you pick up with the eyedropper tool. This is why it’s so important for your green screen to be consistent in color!)
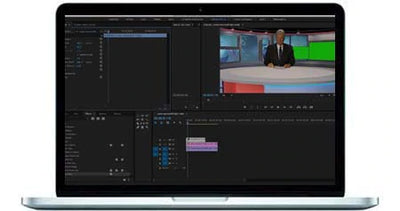
Step 7: Preview Your Virtual Set
You should now see your virtual set behind your presenter or main subject in the Program Monitor.
In the Timeline, you can drag your playhead around to check out your virtual set throughout your entire footage.

Step 8: Add Social Media Lower Thirds
If you want to add the social media animations, you can do so by dragging your animation sequence of choice from the Project Panel onto the Timeline.
Step 9: Resize & Reposition Social Media Animations
You can adjust the size and location of your animations by double-clicking on the animation in the Program Monitor. Use the corners to scale the size. Then drag the animation where you want it on your video.
Step 10: Add Animated Monitors
Drag your animated monitor sequence of choice from the Project Panel into your Timeline.
You can drag the monitor left or right in the timeline to adjust when you want the monitor to come down.
Step 11: Remove Green Screen In Animated Monitor
It’s time to bring back the Ultra Key effect here. Repeat Step 5 and Step 6, but this time you’re dragging the effect onto your animated monitor layer.
You can use the Key Color eyedropper tool here in the Effects Panel. Or you can click the square to launch the Color Picker and set the color green to 255. (This is the max green!).
Your monitor should now be black in the Program Monitor.
Step 12: Move Your Layers Up
Select all your layers in the Timeline. Hold down the alt key + up key on your keyboard.
You should now have an extra empty layer on your timeline underneath all your initial footage.
Step 13: Add Monitor Footage
Drag the b-roll footage you want to appear in the monitor into the empty bottom layer.
Set the start of the footage to right after the animated monitor comes down.
Step 14: Add Additional B-Roll Footage
To stitch several pieces of b-roll footage together, right-click on your b-roll footage in the timeline. Select Nest. This will turn your b-roll into its own sequence. Give it a recognizable name, like ‘b-roll’.
By creating a sequence, you can go in and edit this monitor footage as much as you like without having to adjust the main sequence.
Pro Tip: Add transitions to your b-roll footage in the Effects panel.
Step 15: Fade In Monitor Footage
Add fade or dissolve to the b-roll footage. Drag your favorite effect onto the b-roll layer in your main sequence.
Step 16: Reposition Your Presenter
If your presenter or main subject is in an awkward spot. You can reposition the presenter by dragging the footage around within the Program Monitor.
Step 17: Remove Any Remaining Green Screen
This can happen particularly on the edges of the footage.
In Effect Controls, add a mask to your green screen footage to crop out any missed green spots. You can reposition the edges of your mask in the Program Monitor by dragging the corners.
Step 18: Fade Out Monitor Footage
Similar to the fade-in. Add a fade or dissolve effect to the end of your b-roll footage.
Make sure to adjust the length of your b-roll layer to end immediately before the animated monitor comes up.
Step 19: Extend Length Of Animated Monitor
Make your animated monitor stay lowered longer.
Drag your Timeline playhead to somewhere before the animated monitor goes up. Splice the animation with the Razer tool.
Drag the sliced portion of your monitor animation clip to where you want the monitor to go up.
Right-click on the first half of your monitor animation and select Add Frame Hold. Drag the frame hold clip to adjust the length and connect with where the monitor goes back up.
Pro tip: You can use the same method to extend the length of your virtual set background.
Step 20: Add Additional Animations
Replicate the above steps to add additional monitors and social media animations.
We hope you enjoyed this tutorial! If you are interested in the virtual sets used in this tutorial, please check out the products below!