How do I change backgrounds in vMix?

Video Transcript:
Hey this is Robert from virtual set lab and today i'm going to show you how to use our latest virtual set this one right here in a program called vmix.
vmix is a live streaming platform that allows you to do real-time video editing you can also do post-production editing if you if you want to but it's really more designed for doing real-time video productions.
You can stream live you can stream to facebook and youtube and all those different platforms... the power of this program comes in that you can actually have virtual sets that have camera moves and various graphics that you can control on the fly.
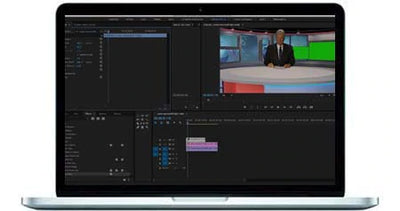
So we've got this little lower third here with a facebook handle and whatnot and we can have that coming in and out we have our presenter and our virtual background and our virtual b-roll shot in this monitor area right here.
So we've actually set up this virtual set as a normal template for any other video editing platforms that you might use but also included for free a vmix version that will allow you to just jump right into it so let me i'm going to completely wipe this and show you from scratch basically how it works so let me do that and so
The first thing i'm going to do is load up the virtual set and when you download the file from us it's in a zip folder you'll want to unzip that folder and and then you'll see the normal mp4s and graphics files that usually come with the virtual set and then you'll also see a vmix folder.
For the vmix folder you'll want to load up vmix and then click add input come over here to virtual set and browse to the folder to your vmix folder for that particular set we're going to use the blue hex virtual set hit select folder and then there's actually an xml file inside of the vmix folder that tells it how to put everything together and so this is kind of what you'll see when you first load up the virtual set
You've got a bunch of different monitor options and then you can see your main presenter area and so now what i'm going to do is i'm going to load up the footage that we're going to use normally you would maybe use a video input so if you have a webcam hooked up to your computer or any other kind of camera you can add that as an input and put yourself behind a green screen and then do this in real time but since i'm not doing it that way, i'm just going to drag in a piece of green screen footage that i have and i'll go ahead and hit play on it and tell it to loop and now it's just going to play and loop for as long as we have it there and then i'm also going to import a piece of b-roll footage to throw up in a monitor so that's going to be this piece of footage do the same thing, hit loop hit play so it'll start playing so this is your virtual set settings.
So we'll go to setup and then you have all of your different layers already laid out for you so you have the virtual set which is the background layer and then you have all the different screen monitors and then your talent layer as well and so we're going to switch the talent to so we're going to select it and then we're going to tell it that the input is this piece of footage right here which is our green screen lady on the screen there and now we need to chroma key out the background this is very easy.
Just click this gear icon go over to color key click the eyedropper tool sample your green in the monitor and then i just right here they've got these auto key presets and they actually work pretty good i'm going to hit number two and that'll knock the green screen right out pretty decent clean key there all right um and then the next thing we're going to do is decide which monitor we want to use in the scene so i'm going to use the monitor that is just over her left corner her left let's see our left her right hand shoulder and so i'm going to leave those on but for screen 2 3 and 4 i'm going to select it and then turn that layer off so i'm going to go down and select these different layers and turn their visibility off on those layers so all we have left is input one here
And so now i'm gonna go back to screen one and i'm gonna change the input for that to this piece of footage right here which automatically scales and positions your footage in the screen there all right and then next what i'm going to do is i'm just going to import one of the lower thirds into the scene and these also come with every angle of the virtual set and choose the youtube one and so you'll see if i click on it and hit play you'll see it's the little youtube lower third and then if we want to get that on top of our presenter we'll just hit this these are kind of like layers so we've got a layer one and then layer two.
You can also loop this or not and then what we wanna do i'm gonna play it for a little bit and then pause it for a second and then i'm going to click the gear icon and position it where i want it you can also zoom in zoom out like that and if you want text to show up here the the social media lower thirds templates actually come with premiere after effects photoshop and a couple other different formats and so what you'd want to do is go into one of those programs or in your own video editing program add your handle on this onto this lower third and then export a a video that you could import into say vmix just like this and so play through here.
So now the way i've got this set up we've got our virtual set we've got our presenter we've got our b-roll footage and then if I ever want to queue up this youtube handle then as you know we're presenting during the show i could just hit the play button here and it'll show up on the screen and it only shows up for a couple of seconds and then it'll actually go away so the same thing for the presenter if we want to move her around we just click the gear icon and then reposition our presenter anywhere in the scene.
And that's pretty much it so you can actually set up multiple instances of the virtual set with you know one with the monitor one without you can cue between those two different sets on over here in this camera settings for the virtual set there are four different preset camera moves so you can start on a wide shot and then zoom in, pan, close-up shot and then back to the wide shot.
And let's see these settings change the speed at which this camera runs so fast medium slow and then cut would cut between the different camera shots
So vmix is a great piece of software highly recommend that we have a lot of clients and customers that use vmix and so we've had a lot of requests for us to create our sets in this format so as long as these are popular then we'll continue to make them and we hope it helps and we hope this tutorial helped answer some questions!