How do I change backgrounds in Davinci Resolve?

Hey everyone this is Alex with Virtual Set lab and today we're going to be taking a look at how to use a virtual set with DaVinci Resolve
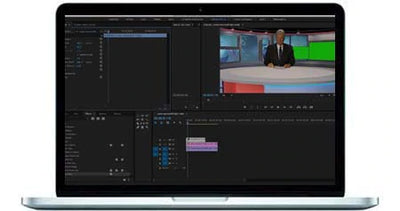
all right so let's open up DaVinci Resolve and we're going to hit new project I'm going to call this DaVinci tutorial and now let's navigate to our desktop or finder and bring in our media we've got green screen prisoner footage we've got a HUD graphic and then a virtual set lab background with a monitor in the background drag and drop that all on to DaVinci Resolve
And it's saying the clips have different frame rate than the current project settings and then we can hit change so that our timeline matches the same settings as our media I'm going to change to the edit workflow I like working in that workflow and adding layers
So I'm going to add our virtual set lab background and then I'm actually going to move that up a layer so that I can add this HUD graphic below it because we're gonna have to cure a background so if I highlight the virtual set lab background and then go to the fusion workflow here that's where we're going to add our key so if you select this media
Hit shift space on your keyboard that's going to bring up the tool selector and so type in Delta here and then hit add and so that brings up your key settings here and so we want to click and drag you can't just click but you have to click and drag this eyedropper over to your background and so it's going to key that color here now we can go back to our edit workflow
And if you select our HUD graphic and then go up to this inspector workspace that lets you change the size or the zoom as they call it in the position 4 monitor media you notice it's not lining up and that's because the monitor is at an angle and so not all monitors and virtual set lab backgrounds are angled like this so you could stop here if it's not angled but since this one's angled I'm going to show you how to use the corner pin effect to get this to line up better so if you right-click in our media pool window you can hit new fusion composition and let's call this corner pan comp create
And then if we double-click it it's going to open up the fusion workflow it's what we want to do is bring in our Virtual Set lab background and then our HUD graph media that's gonna live on that monitor and you can move things around really anywhere in here just organizing it and the way it's easiest for you to see it doesn't really matter where these things are on the graph so let's select our media in one hit shift space on our keyboard to bring up merge if you type that in and then hit add and then if you click on this gray box for media
And drag that to the merge one box that basically merges these two clips so that your final result will include both of those clips and then you can click and drag from merge two media out one and that is basically what you're seeing is the final result so with media and two selected that's our graphic that's gonna live on the monitor if you hit shift space on your keyboard again and type in corner click on corner positioner and then add and you'll see that that added little corner pins that you can click and drag to line up and it's a little hard to tell where exactly these are so if you hold down commander control and then zoom with your scroll wheel on your mouse you can also use your scroll wheel to move left or right or up or down
But that makes a little easier to line it up with the corners so let's hold down command and scroll out well not commands scroll into this one
Let's make this fit again since we already have this virtual set lab media keyed we only really needed this corner pinned graphic so we can delete our virtual set lab background and the merge effect and then just drag your corner positioner to the media out so that that's all we're getting over an alpha channel so if you go back to our edit workflow this is our HUD graphic on the video one track that wasn't corner pinned so we can just hit delete on our keyboard and get rid of that
And then drag in our corner pin comp below the background extend that out
there we go its corner pinned and then our top Virtual Set lab track is already keyed so now all we have to do is bring in our presenter footage and let's drag that on top so that it's video 3 and then with that clip selected go to our fusion workflow again highlight media in one it shift space on your keyboard to bring up your tool selector again and then let's do the Delta keyer click Add now
If we click and drag on our background color eyedropper that key tit there now let's go back to our edit workflow and you'll see that she's keyed and if you go to this inspector tool here that will let you adjust the position you can move her left or right now you'll see that we've got some green spill on the screen here so we're gonna need to clean that up if you go to our fusion workflow for the Delta here you can change the view mode to matte so that you can see black and white and you'll see where that spill was it's kind of grainy here so in order to clean that up we're gonna need to go to the matte View mode here and let's bring up our threshold that's basically crushing our blacks a little bit more until all that graininess is gone in the corner and then let's crush our whites a little as well because if we zoom in here you'll see that she had some noise so if we bring down our whites they'll clean that image up a little bit now I got to change our View mode active final result and let's go back to the edit workflow and you'll see it's cleaned up there we can move her move her around and there's no more green spill and so if you'll see our presenter footage last longer than our background so what you can do is highlight the virtual set lab media hit command or ctrl C on your keyboard and go to the end of that clip and then hit command or control V and let's do the same with our fusion composition
Hit command or control C and then command or control V so since these loop let us have a looping video underneath and that's about all there is to it on this one thanks everyone for watching!