How do I change backgrounds in Adobe Premiere?

Video Transcript:
Hey this is Robert from virtual set lab and today i'm going to show you how to use one of our latest virtual sets in adobe premiere pro 2022.
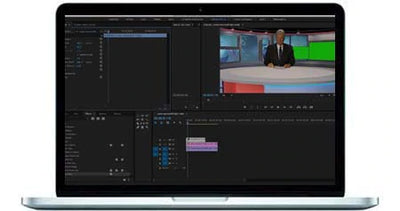
So currently you can see kind of how this virtual set is laying in here in this production we've got our presenter on a green screen we've got our virtual set in the background we've got a social media lower third popping them to the scene and then our monitor comes down and we have some b-roll footage in the monitor area
So i'm going to show you some of the best techniques to make this work in your workflow so there's a bunch of different ways of doing this but this is one of the ways that we found is the most efficient ways to set up your scene and get going with this edit so let's first start off by making a new composition or sequence if that's what they call it in premiere pro
i'm just going to use the size of our virtual set which is this render blank with the virtual sets all of them come with different monitor area setups in that are pre-rendered and then it also comes with a blank version and as well as the social media and so i've actually imported the premiere social media project template into our main project and so i'll show you how we can you know import these social media lower thirds into the overall edit
So the first thing i'm going to do is i'm going to take this renderblank.mp4 drag it down to the new sequence button let go and now we have our virtual set in the background there this is the blank version so even though it's only rendered to about 30 seconds or so you can add a frame hold on this this one because there's no animated monitors and you can extend the length and duration of this as long as you need to and then one question we get a lot is if you're using the animated monitor setups you know how do you get those to extend to the you know the length of your presentation and i'll show you how to do that in just a moment
So the next thing we're going to do is bring down our green screen footage under the timeline i'm not going to worry about audio there we're going to add a key effect to this to remove the green screen and we're going to use the ultra key so that's in your effects panel just do a search for keying and ultra quick key will pop up drag it down onto your footage and then go to effects controls use the eyedropper tool select some of the green in your scene and then for this particular one i'm just going to do an aggressive key which should key out relatively good on this edit here
And so now we have our talent on the green screen in our virtual set so the next thing i'm going to do is add the social media lower thirds i'm going to go into our social media animations and go to the sequences and i'm just going to drag the youtube sequence down onto our timeline get rid of the audio scale it up just a little bit and reposition it where i want it to go just like so okay so the next thing we're going to do is we're going to bring in one of the animated monitors and so i'm going to do the left animated monitor so i'm going to drag that down onto the timeline right about there
And so you can see that we go we've got our blank virtual set and then it goes right into our virtual set with the left monitor and then it stays down for a little bit and then it will come back up on its own so what i'm going to do is before we actually do this first i'm going to knock out the green in this monitor area so do that just using a ultra key effect again
And you can either eye drop it eyedropper it or you can just select and max out the green which is 255 and that will knock the monitor area and which will allow us to see through to the bottom layer
So i'm going to select all of these layers hold down the alt key and use the up key on your keyboard to move everything up one layer and then this bottom layer is going to be our footage our b-roll footage so i'm going to drag our b-roll footage down into the scene and you can see it's playing right there um now one thing i like to do is when i'm doing b-roll footage because you never know if you're going to have like multiple pieces of b-roll footage and you want to edit those together so what i'm going to do is i'm going to just nest this into a it's own sequence called b-roll and then that way if i ever want to go in and change the b-roll that shows up in this monitor area right here i can just go into this b-roll footage
Everything is full hd or 4k and i can you know add transitions i can add new pieces of footage to it and they will all show up in this area right here but what will also happen is when i scale this i'm going to scale it down a little bit
into position here
like that now the any footage that we throw in this folder into this timeline is automatically going to be scaled positioned where it needs to go
right there i also get a lot of questions sometimes with uh with this particular set where when the animated monitor comes down
you want to kind of have the footage um fade in as it when it comes down and so you'll the way you'll do that is i usually just leave it dark or blank until the monitor comes almost all the way down and then i'm going to add a fade or dissolve on the b roll footage and so as the monitor comes down it's black and then it fades up as it comes to a rest just like that
all right i don't really like the way the presenter is covering up too much the monitor so i'm just going to adjust her a little bit move her over just here you can see there's a little bit of green screen left in our footage there it happens a lot of times on the edge just depending on what camera you're using and so i'm just going to add a quick mask to this footage so we can get rid of that
like so and so yeah so now i like that a little better we've got our lower third in there when we got our footage i'm gonna just duplicate this footage over and over and over again on our b-roll timeline so i can make this footage a little bit longer here and then you'll see on this studio that it's going to go back up like that um so if you wanted to uh have your footage end right there then you would just basically fade out similar to way we came in so we'll let it fade out and then the monitor goes back up but if you wanted to extend it even further then here's the way i would do that in premiere basically select your virtual set with the left monitor mp4 slice it right before the monitor goes up right and then move that down the timeline and then here add a frame hold while the monitor is down
and now you can duplicate our presenter down the footage there like that and so now you can see that our the time that our monitor is down is extended and then when it gets to the end of this timeline it goes back up let's fade out first
goes back up and then we'll go back to the blank virtual set which you can add a frame hold
and extend for however long you want it to be um you could also uh you know bring in a secondary monitor you know on the right so maybe it goes down goes back up on the left
and then it immediately comes down on the right so a lot of different options there
for what you're doing and that's pretty much it i hope you guys like the new virtual set and let us know if you have any questions thanks bye!