How do I add a virtual background in Davinci Resolve?

Davinci Resolve is a popular video editing program for Linux, Mac, and Windows, used by content creators, live streamers, and filmmakers worldwide. Content creators and live streamers routinely use Davinci Resolve or other similar software to create/edit virtual backgrounds. These digitally created backgrounds may be a combination of different videos, photos, graphics and/or other media. We previously did a video tutorial for Davinci Resolve showing you how you can create a virtual background using keying (greenscreen) and other techniques.

For those who prefer written content to follow, here is the accompanying article. Watch the video on YouTube using the video tutorial link above.
Steps to add a virtual background using your Davinci Resolve program
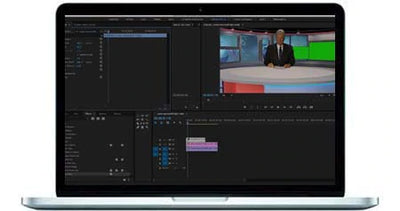
A little about this project. In this tutorial, we used three media files, which you can find listed below. One with a female presenter, another with a green screen background and monitor only, and finally a HUD graphic. When the edit is complete, the monitor’s green color will be replaced with the HUD graphic, making it appear to be a real news monitor. The Presenter’s background will also be keyed out, so that it appears the Presenter, who was shot separately, is on a real set with the monitor and background we’re editing.
Step 1: Creating a new project and organizing media files

We first open the Projects window, then we click on the New Project icon to create a new file. We name the New Project, typing in the name, and hitting the Create button. We’re then taken to the main Davinci Resolve editing interface.
Next, we use the Desktop Finder. Once opened, we’ll use it to bring in the footage and graphics for this project.
In this training, we’ll be using three media files:
- Green Screen Presenter Footage
- HUD Graphic
- Virtual Set Lab background with monitor
After dragging and dropping in our media files using the Desktop Finder, you may see a window open with the following message: “The clip(s) have a different frame rate than the current project settings.” Seeing this message means the uploaded clip has different framerate settings than the project default. If this occurs, click the Change button in the right corner. After clicking Change, your project settings and imported media will match.
Step 2: Starting the edit process with the Virtual Set key

There are different Davinci workflows that can be used, however for the purpose of this training article, we’ll start with the Edit Workflow. This workflow is easier for some when adding layers or nodes, which we’ll be doing during this project.
Next go to your footage and find the Virtual Set background/monitor. We’ll start by dragging the Virtual Set background and monitor to the project timeline. Using the mouse, we can adjust its position in the screen, positioning it UP or DOWN or to the LEFT or RIGHT on the graph to comfortably see all files.
Again, using our mouse, we Click and Highlight the Virtual Set monitor node. With the node still highlighted, we’ll go to the Fusion Workflow to add a green screen key. We start by clicking the MediaIn1 node, then click Shift + Space to bring up the Tool Selector.
Once the Tool Selector window is up, we type, DeltaKeyer, in the search box and click Add. Now we have the Key Settings menu open. Still in the Key Settings menu, we Click and Drag the eyedropper tool to MediaOut1 for the Virtual Set background with monitor. (FYI: The eyedropper must be Clicked and Dragged. Just clicking won’t work here.)
We use the eyedropper tool in the MediaIn1 window (Virtual Set monitor), clicking it with the eyedropper. With the green screen color now keyed out or erased, the Virtual Set monitor is an alpha channel. It’s time to key the HUD graphic so the two can be combined.
Step 3: Key HUD graphic and attach it to the monitor using corner pin

Now we exit the Fusion Workflow to return to the Edit Workflow window. Once there, we select the HUD graphic and Click on the Inspector Workspace. Here we can adjust Zoom (resize) and Positioning, as well as other settings.
Because the positioning or perspective of the HUD graphic used in this project is slightly askew/oblique (i.e., turned at a slight angle) we’ll need to re-align or straighten it so that it fits correctly in the keyed-out monitor on the Virtual Set background. When done successfully, the edges of the two media files will be aligned; making it look like a real monitor (the Virtual Set monitor) with accompanying video footage (the Hud graphic.)
To do this we’ll use the Corner Pin effect.
Creating a realistic virtual set up using different elements

We start by right clicking in the Media Pool window to get a New Fusion Composition drop-down, then click New Fusion Composition Clip. We name the New Clip “Corner Pin Comp,” then hit the Create button. Then double click the new clip to get back to the Fusion Workspace.
Now, we’ll click and drag in the Virtual Set background with monitor and the HUD graphic that will live on the fake monitor screen. We do this so we can combine the two separate elements to create a realistic virtual monitor with footage.
We start by selecting the MediaIn1 node for the HUD/Corner Pin Comp, then click Shift + Space to open the Merge Tool and click the Add button. A Merge1 node appears next to MediaIn1 node for the HUD.
Now, we’ll turn to the MediaIn2 file (for the Virtual Set.) Each node has two buttons, one on each side. There’s a small triangular button to the left. On the right is another button, this one shaped like a square.
Now, we click on the gray button for MediaIn2 (Virtual Set) and pull out an Arrow connecting it to the Merge1 node. This merges the clips so any final result will include both. Next, we’ll click on the gray box next to the Merge1 node and connect an Arrow to MediaOut1, connecting Merge1 to MediaOut1. MediaOut1 will be the final result output.
Using the Corner Pin Effect to align edges in two different media files
Select MediaIn2, then click Shift + Space again to pull up the Select Tool menu. Type in “corner positioner,” then click the Add button to close out of the window.

You’ll now have a Corner Positioner pin that can be clicked and dragged to reposition the way the HUD lines up (the perspective.) When using this tool, if you have difficulty seeing how it lines up in comparison to the other right angles, you can zoom in. If using a mouse, hit CMD or CTRL as you turn your scroll wheel. You can also use it to move UP/DOWN, LEFT/RIGHT in the window. This makes it easier to line up the corners. We continue to drag the Corner Pin tool until the edges match up perfectly. Now that the HUD monitor is lined up, we delete the Virtual Set and the merge effect nodes brought in earlier. We only included them here to show you the Corner Pin effect and for comparison.
Now, there are three nodes remaining: MediaIn2, CornerPositioner1, and MediaOut1. Since we deleted the other files, we’ll connect the MediaOut1 file to the CornerPositioner1 file instead. We’ll do this by once again dragging out the Arrow from the CornerPositioner1 node and dragging the Arrow to MediaOut1. This becomes the output to the alpha channel.
We return to the Edit Workflow where we delete the original HUD graphic that wasn’t corner pinned; we’ll be using the file we just edited in its place. We drag in the file, “Corner Pin Comp” that we just created. So, now we have a file with the HUD graphic correctly aligned to the other file, ready for use.
We also extend the length of the Virtual Set background and monitor file to match other footage running time. We do this by grabbing and dragging, extending with the mouse.
Step 4: Keying Green Screen Presenter file
Because the Virtual Set footage is already keyed, we turn to the Green Screen Presenter. First, we drag the Green Screen Presenter file onto Video Layer 3. We then select this footage and return to Fusion Workflow.
With the Presenter footage in the Fusion Workflow, we highlight MediaIn1. Then Shift + Space on the keyboard to bring up the Select Tool menu again. We then type in DeltaKeyer to bring up the keying tool. After this, using the same process as before, using the eyedropper to get rid of the greenscreen background.
When completed, we’ll return to Edit Workflow. The green color is now keyed out.
On the Edit Workflow, go to the Inspector Tool again to adjust positioning as needed.
Cleaning up the key

Looking at the keyed-out Presenter file, we see there is some green spill from the green screen/keying process. To clean this up, we’ll have to go back to the Fusion Workflow and
click on DeltaKeyer node to access the DeltaKey tools once more. Then we Click on the View Mode dropdown on the menu to change from Final Result to Matte View Mode. Now, click on the Matte icon found in the Matte View. Doing this will change the viewing screen from color to a black and white image outline, making it easier to see grainy areas causing the bad key. We adjust the key using the threshold slider, until all the graininess is gone.
Finishing touches

Now we change View Mode back to Final Results and confirm the green spill is gone.
We return to the Edit Workflow and using the shortcuts for copy and paste, we add more footage wherever needed to make each file the exact same running length. Because these files are set to loop, they’ll continue to run as looping video.
This concludes our tutorial. If you want information about our virtual set labs or have questions, check out our www.virtual-studio-set.com website today.