How to Add a Background in VMix
How to Add a Background in VMix

BACKGROUND INFORMATION:
This program is a very powerful and useful video editing tool that gives you the ability to add camera reels and various graphics to the background of your video. It allows a lot of flexibility and simplicity to video editing. It is a very useful software for anyone in need of a video editing tool, whether it’s for professional or personal use! It is like any other of its kind and provides accessibility to any user so don’t hesitate to give it a try! Below is a step by step guide on how to use the program with instructional images included.
STEP ONE: Download the Virtual Set From Files

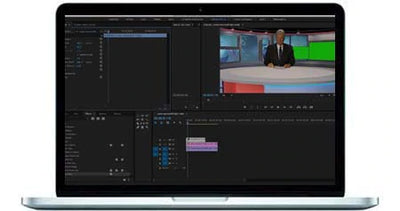
You will first begin by loading the virtual set and clicking “add input”. When you download the file from the virtual studio set website, it will be in a zip folder. You will need to unzip that folder and you will find other files that come with the virtual set, if you scroll down you will see a folder titled “Virtual Set”(which is highlighted in green in the top image). For this example, we will be using the “Blue Hex” virtual set. When the file is loaded up you will see options to edit the monitor and you will see the main presenter outline shown as a black shadow (as shown in the bottom photo).
STEP TWO: Add Video Input to Virtual Set
 After importing the VMix file, you will want to add in your green screen footage to the screen on the left side. Your virtual set settings will be beneath the two screens and it will include all of the different layers already laid out. This includes the virtual set, which is the background layer, then you will have all of the different screen monitors, and you will have your talent (aka green screen layer) as well. You will want to select the talent layer and click on input (which is circled in red in the photo above). You will then want to select the background to make the input for the green screen layer the footage from the talent layer.
STEP 3: Chroma Key Out the Background
 To do this you will want to select the gear icon (as circled in blue in the photo on the top). Then go over to the color key and select the eyedropper tool. You will then want to sample the green background from the monitor. After this, there are auto key presets so you just click the person in the talent layer and it will automatically transfer this content over to the background layer and it will appear like the image displayed on the bottom.
STEP 4: Select Which Monitor to Use
 For this example, we will be using the monitor displayed to the left of the model (Input 4, as circled in black in the top image). To do this, you will need to go to settings (as circled in yellow in the first image) and turn off the visibility (which is highlighted in green in settings) for all of the layers, except for layer four. After completing this, the monitor should say layer one (as shown in the bottom image).
STEP 5: Adding Content to the Input
 At this point, you must go back to screen one and select input. For the input in this example, we will be using the piece of footage shown on screen three, so after selecting input you will click on screen three and it will appear in the place where it previously said input one. Your input will automatically be scaled to fit the screen. When you are completed with this step it will look like the image shown.
STEP 6: Importing Templates From Virtual Set
 For this step, we will be importing a preset template layer into the first screen. To do this we will import one of the lower thirds templates to be seen, which comes with every angle of the virtual set. After selecting this, you click the two button beneath this input, which means it is the second layer (circled red in the photo), and this YouTube logo will be shown on top of the presenter, as shown in the photo. After this you’re going to play it for a little bit and then pause it. Then you will position the logo where you want it.
STEP 7: How to Add in Text
 In order to add text on top of an imported template, as shown in the photo, the lower thirds templates come with features including photoshop. So in order to add text, in this example an instagram handle is suggested, you would go into one of these editing apps or your own video program and add text on top of the logo or whichever template you decide to use.
STEP 8: How to Make a Layer Appear for a Few Seconds
Since we played and paused the YouTube logo for a short period of time it is very easy to make it appear at any given time for a few seconds. We can press the play button at any time and it will appear for a few seconds and then disappear as needed.
STEP 9: How to Reposition Layers
 To reposition a layer, in this example the presenter is repositioned, you simply select the gear button. In this instance, you must select the gear option on the talent layer and then click on the presenter and you can easily reposition them. As you can see she is moved to the right side of the screen in the photo.
Additional Information
You are able to set up multiple instances of the virtual set, one with the monitor or one without it. There are also multiple different camera settings, including a zoom in feature, a panning to the side feature, a close up shot feature, and a wide shot feature. You can also change the speed of the camera shots with three different speed features! Overall, this software has many unique and easy to use features that few other softwares like this have. This software is great to use whether you are an expert or beginner in video editing!
You’re Finished!
Congratulations! Now you know how to use VMix and its features. VMix is a great software with a lot of consumers. There have been many requests by customers for the sets to be created in this format! So if you continue to enjoy this software we will be continuously upgrading our platform to fit your needs!